Showing posts with label PiFace. Show all posts

Sunday, September 6, 2015

Raspberry Pi: How to create your own WebSocket API - Part 2

Part 1: Setup xcode project

Now that I've set up the server to handle request from the client we can set up the iOS client. Either you can start with a blank project or fork/clone my github example.


  • Now install the SocketRocket websocket client library.  There are a couple ways to do it.  I used cocoapods, follow the directions for installation here.   I setup a basic uitableview within my viewcontroller.  
  • Link your tableview to your viewcontroller and call it tableView. 
  • Setup your viewDidLoad

static NSString *cellIdent = @"cellIdent";
NSMutableArray *outputs; //global array of our outputs for the piface 
NSMutableArray *inputs;  //global array of our inputs
- (void)viewDidLoad {
    [super viewDidLoad];
    _webSocket = [[SRWebSocket alloc] initWithURL:[NSURL URLWithString:@"wss://192.168.5.21:9000" ]];
    _webSocket.delegate = self;
    outputs = [@[@0,@0,@0,@0,@0,@0,@0,@0] mutableCopy];//pre populate our array with zeros
    inputs  = [@[@0,@0,@0,@0,@0,@0,@0,@0] mutableCopy];// "
    self.tableView.dataSource = self; //don't forget to set your delegate for your datasource
//we have a custom xib for our tableview cell.  register it here
    [self.tableView registerNib:[UINib nibWithNibName:@"OutputTableViewCell" bundle:nil] forCellReuseIdentifier:cellIdent];
    [self.webSocket open]; //open our websocket
}


We need to set our socket rocket delegate so we can handle messages from the server:


-(void)webSocket:(SRWebSocket *)webSocket didCloseWithCode:(NSInteger)code reason:(NSString *)reason wasClean:(BOOL)wasClean{
    [self performSelector:@selector(connectWS) withObject:nil afterDelay:5];
}
-(void)webSocket:(SRWebSocket *)webSocket didFailWithError:(NSError *)error{
    [self performSelector:@selector(connectWS) withObject:nil afterDelay:5];

}
-(void)webSocket:(SRWebSocket *)webSocket didReceiveMessage:(id)message{
    NSData *data = [message dataUsingEncoding:NSUTF8StringEncoding];
    NSDictionary *json = [NSJSONSerialization JSONObjectWithData:data
                                                         options:NSJSONReadingMutableContainers
                                                           error:nil];
    [self parseJSON:json];
}
-(void)webSocket:(SRWebSocket *)webSocket didReceivePong:(NSData *)pongPayload{
    
}
-(void)webSocketDidOpen:(SRWebSocket *)webSocket{
    
}
-(void)parseJSON:(NSDictionary*)jsonObj{
    if([jsonObj isKindOfClass:[NSArray class]]){
        for (NSDictionary *dict in jsonObj) {
            if([dict objectForKey:@"Outputs"]) [self parseOutputs:[dict objectForKey:@"Outputs"]];
            if([dict objectForKey:@"Inputs"]) [self parseInputs:[dict objectForKey:@"Inputs"]];
        }
    }
    else{
        if([jsonObj objectForKey:@"Outputs"]) [self parseOutputs:[jsonObj objectForKey:@"Outputs"]];
        if([jsonObj objectForKey:@"Inputs"]) [self parseInputs:[jsonObj objectForKey:@"Inputs"]];
    }
}
-(void)parseOutputs:(NSString*)outputStr{
    for(int index=0; index < outputStr.length; index++){
        NSString *val = [outputStr substringWithRange:NSMakeRange(index, 1)];
        [outputs setObject:@([val boolValue]) atIndexedSubscript:index];
    }
    [self.tableView reloadData];
}
-(void)parseInputs:(NSString*)inputStr{
    for(int index=0; index < inputStr.length; index++){
        NSString *val = [inputStr substringWithRange:NSMakeRange(index, 1)];
        [inputs setObject:@([val boolValue]) atIndexedSubscript:index];
    }
    [self.tableView reloadData];
}

Note what we just did here:

  1. Set up the delegates
    •  webSocketDidOpen
    • didRecieveMessage
    • didCloseWithCode
    • didFailWithError
  2. Created code to handle the JSON message
    • Convert our JSON msg into NSData and then into a NSDictionary
    • Parsing Inputs and Outputs and modifying our global arrays for each
Now we set up the table a bit more:

-(UITableViewCell*)tableView:(UITableView *)tableView cellForRowAtIndexPath:(NSIndexPath *)indexPath{
    OutputTableViewCell *cell = [tableView dequeueReusableCellWithIdentifier:cellIdent forIndexPath:indexPath];
    if(indexPath.section==0){
        int output_num = [@(indexPath.item) intValue];
        [cell setLabelText:[NSString stringWithFormat:@"Output: %d",output_num]];
        [cell setOutputStatus:[outputs[indexPath.item] boolValue]];
        [cell setOutput:output_num];
        [cell setCmd:^(int output) {
            [self.webSocket send:[NSString stringWithFormat:@"{\"Output\":\"%d\"}",output]];
        }];
    }
    else{
        int input_num = [@(indexPath.item) intValue];
        [cell setLabelText:[NSString stringWithFormat:@"Input: %d",input_num]];
        [cell setOutputStatus:[inputs[indexPath.item] boolValue]];
        [cell setCmd:nil];
    }
    return cell;
}
-(void)connectWS{
    _webSocket = [[SRWebSocket alloc] initWithURL:[NSURL URLWithString:@"wss://10.10.55.21:9000" ]];
     _webSocket.delegate = self;
    [self.webSocket open];
    
}
-(NSInteger)tableView:(UITableView *)tableView numberOfRowsInSection:(NSInteger)section{
    if(section==0)
        return outputs.count;
    if(section ==1)
        return inputs.count;
    else
        return 0;
}
-(NSInteger)numberOfSectionsInTableView:(UITableView *)tableView{
    return 2;
}

When we set the table up we use our custom cell class:

  1. Cell count/ Section count.  We have two types of cells. One we don't have a reaction to button presses (inputs we are reading). And the other we have the outputs we want to control and see status.    
    • return 2 in our numberOfSectionsInTableView
    • return our output/input row count depending on the section number in numberOfRowsInSection
  2. Connect our cells up to the status stored in the global input/output array
    • If it is an output we set up the callback to send a custom message to our WebSocket Server.  If you recall we set our server to respond to JSON messages formatted as {"Output",pinNumber}.  So we use the IndexPath.Item to determine our position in the inputs/outputs.
    • If it is an input we do not set the "setCmd" callback from our button press.  
  3. We also set up a connectWS method to have it attempt to re-connect after 5 if the websocket connection drops. (usually happens when you lose connection to wifi/cellular or if you restart the websocket server.
In this iOS app I won't connect my custom plug code since you haven't set up the server to respond to anything but output commands.  We could set it up to be {"Plug":plugNum} in the server if we needed.  

Now we only color our output and input buttons ONLY when we know the status.  Don't set the color just because you tapped the button, let the server reply with it's status.  


For simplistic purposes I didn't decorate it anymore than this in this example.  You can be creative and set up your UI however it seems easiest.  Note that iOS does not keep this connection open when you close your app.  I don't handle it elegantly in my example code.  If you wish to have your phone get updates on your sensors while off you will need to set it up as a background service and have it poll a REST-like service you can set up on your Pi with-in the same server app.  


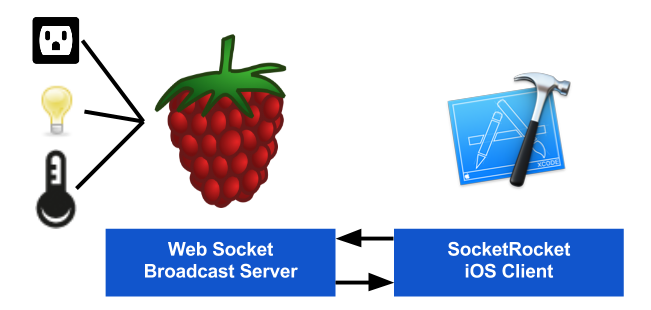
Custom API and modules for WebSockets

WebSocket communication is one of the best ways to get realtime data to your client device.  Creating custom class modules for each sensor type connected to device can make your code and  organized and and your project expandable.  

Raspberry Pi: How to create your own WebSocket API - Part 1


A while I posted my very first raspberry pi home automation project (LightSwitchPi) and since then I've learned a lot more python and circuitry.  I, being one of many, achieving exactly what the Raspberry Pi Foundation wanted, Education.

Here's a quick tutorial on how to create and form your own home automation api for expansion.  I am going to use Autobahn Python for the WebSocket backend and in Part 2 going to build a simple iOS app to communicate with the Pi via WebSockets (SocketRocket).

Part 1: Custom Sensor/Control Modules:

Install the following if you don't have it:

  • For WebSockets, Autobahn Python :
    • sudo apt-get install python-twisted python-pip 
    • sudo pip install autobahn
    • github example
In the github example there are several files to note:
  • websocket.py
    • The autobahn python based websocket broadcast server with ssl encryption.
  • ButtonListener.py
    • The lightswitch (module) using the first gen PiFace Relay Board.  
  • PlugPoller.py
    • A wifi plug I built (link here, forgive the sloppy design :-P ) with a uart-to-wifi interface.
  • web folder
    • simple webpage showing the broadcasts from the websocket server for testing.
First we need to set up our modules.  I'm using the term modules to clarify that you can at anytime add to your websocket server "things" your Raspberry pi can do (I.E temperature sensing, motion, etc...).  In each module you set it up as a separate thread.  

For example ButtonListener is as Follows:

import threading
import os
import pifacedigitalio
from sys import exit
from time import sleep
import time

class Buttons(threading.Thread):
    cmd = None
    loop = True
    button1Callback = None
    button2Callback = None #set up a callback for each button
    button2LongPressCallback = None #set up custom stuff if needed

We start by importing our needed libraries and creating a class of the "threading.Thread) type. I am creating several callback variables so that when we instantiate our class in the websocket server we can assign those callbacks to broadcast to our clients the status of the button presses.  We continue with the init and the run.  Take note that when input[x] is pressed it sets a variable to true and then doesn't react till you release the button. A way to programmatically set a rising/falling edge detection for button presses.  

def __init__(self):
        threading.Thread.__init__(self)
        self.cmd = pifacedigitalio.PiFaceDigital()
        self.loop = True

    def run(self):
        time_pushed = 0
        pushed_1 = False
        pushed_2 = False
        inputs = None
        # toggle button turn relay 1 on
        while self.loop:
            sleep(0.05)
            inputs = self.input_status()
            outputs = self.output_status()
            # print inputs, ' ', outputs
            if inputs[0] == '1' and pushed_1 is not True:
                pushed_1 = True
                if self.button1Callback:  # json callback for button press
                    self.button1Callback('{"Inputs":"' + self.input_status() + '"}')
            if inputs[0] == '0' and pushed_1:
                pushed_1 = False
                self.cmd.relays[0].toggle() 
                if self.button1Callback:  # json callback for button press
                    self.button1Callback('{"Outputs":"' + self.output_status() + '"}')
                    self.button1Callback('{"Inputs":"' + self.input_status() + '"}')
            if inputs[1] == '1' and pushed_2 is not True:
                pushed_2 = True
                time_pushed = time.time()
                if self.button2Callback:
                    self.button2Callback('{"Inputs":"' + self.input_status() + '"}')
            if inputs[1] == '0' and pushed_2:
                time_taken = time.time() - time_pushed
                pushed_2 = False
                if(self.button2Callback):
                    self.button2Callback('{"Inputs":"' + self.input_status() + '"}')
                if time_taken < .5:
                    self.cmd.relays[1].toggle()
                    if self.button2Callback:
                        self.button2Callback('{"Outputs":"' + self.output_status() + '"}')
                    time_pushed = 0
                if (time_taken > .5):
                    try:
                        if self.button2LongPressCallback:
                            self.button2LongPressCallback()
                    except:
                        pass
                time_pushed = 0

We also need to create a stop function so we can exit cleanly from the thread if needed. "def output_status" and "def input_status" are reading the inputs and outputs of the PiFace board and outputting them to a string for our JSON broadcast. "def output_cmd" is a quick method for changing outputs along with outputting the result to the callbacks.

    def stop(self):
        self.loop = False

    def output_status(self):
        list1 = self.cmd.output_port.value
        status = '{0:08b}'.format(list1)[::-1]
        return status

    def output_cmd(self, pin, value, local=True):
        self.cmd.leds[pin].value=value
        if self.button2Callback and not local:
            self.button2Callback('{"Outputs":"' + self.output_status() + '"}')
        return self.output_status()

    def input_status(self):
        list1 = self.cmd.input_port.value
        status = '{0:08b}'.format(list1)[::-1]
        return status


Part 2: WebSocket Broadcast Server Broadcasting

*(For the complete github code see here)
In a broadcast server you need to keep track of the following:
  • Registering clients
  • UnRegistering clients
  • Broadcasting to clients
  • When to broadcast
In my previous post I usually have a polling timer in my websocket server having the server check status of each item and sending it out on change. In this example the "modules" are doing that anyway so we will only need to assign what the callback methods do.
We will put the light switch button module in the init part of the broadcast portion of the server:

class BroadcastServerFactory(WebSocketServerFactory):

    def __init__(self, url, debug=False, debugCodePaths=False):
        WebSocketServerFactory.__init__(self, url, debug=debug, debugCodePaths=debugCodePaths)
        self.clients = []
        self.lighting = Buttons()
        self.lighting.button1Callback = self.broadcast
        self.lighting.button2Callback = self.broadcast
        self.lighting.start()
        self.plugs = PlugPoller(plugIp, 8080)
        self.plugs.statusChangeCallback = self.broadcast
        self.lighting.button2LongPressCallback = self.plugs.toggleAll

Note what we did: 

  1.  We instantiate our Button class and assign the two regular button press callbacks.  Since self.broadcast only takes one argument self.broadcast(msg) it works great for how we set it up in the button class. 
  2. Set up the plugs module along with it's callbacks. 
  3.  We also set up the long button press callback to toggle some plugs.
With those we will broadcast to our clients status changes for inputs and outputs in a JSON format. {"Outputs":"00000000"},{"Inputs":"00000000"}

Since we are not polling periodically we need to let the clients know the status of all the modules when they are registered as a client:

    def register(self, client):
        if client not in self.clients:
            client.sendMessage(json.dumps([{"Outputs":self.lighting.output_status()},
                                {"Inputs":self.lighting.input_status()},
                                {"Lamps":self.plugs.getstatus()}]))
            print("registered client {}".format(client.peer))
            self.clients.append(client)

Part 3: WebSocket Commands from clients:

When our server receives a message from a client we need to handle it if is supposed to control something.  In mine I decided since it's an output I'm toggling I just send a JSON string {"Output",pinNum}.  If it was an analog device you'd need to send a bit more.  With python you can convert json to a dictionary using json.loads(json_string).

    def onMessage(self, payload, isBinary):
        if not isBinary:
            data = json.loads(payload)
            if(data["Output"]):
                output = data["Output"]
                #get current status to toggle the output. 
                current = factory.lighting.output_status()[int(output)]
                newval = not int(current)
                #print(output,' ',current,' ',newval)
                factory.lighting.output_cmd(int(output), newval, False)
                
Remember we put a status change callback whenever we call the output_cmd.  That way all clients get the new status change.


For the iOS portion continue here

Tuesday, September 24, 2013

Home Automation Project #3 Light Switch Cont. - WebUI-Source with WebSockets!

For the best and quickest response times with my webgui I decided to go with websockets. This was my first websocket experiment and it took many, many tutorials and websocket engines for me to finally come to this conclusion. I went with autobahn websockets because of its ease of use and ability to do reactor.callLater() which is the equivelent of a setTimout in javascript from what I understand. With that I used it to constantly check the outputs of my PiFace and send the socket message to the client webapp based off of its changes. So if anyone else in your house turns the lights on or off physically, you can instantly see it change on your phone. Now the only problem is older devices (like my wife's phone) are not all html5 websocket compatible. You may have to create a python cgi script to use as a fallback.

If you are kinda lost and need to recap on the lightswitch series here are the links and summaries:
Setting up the Piface communication listener and the button listener scripts HERE
Pics and description of the WebUI HERE

Setup:
Need to install Twisted, AutoBahnPython, and for the static pages I use lighttpd.

sudo apt-get install python-pip
sudo easy_install autobahn
sudo apt-get install twisted lighttpd


Websocket Server Code:

needs to run on boot after out PifaceListener script (source found here) has started.

Webpage Code:

I copied to my /var/www/ directory:

Tuesday, September 17, 2013

Home Automation Project #2 Rpi Light Switch

Lightswitch Replacement

Parts: PiFace $30,
Rpi Model A $25,
Wifi Adapter $10,
120v to 5vdc adapter $5ish,
Low voltage 2 gange wall box $5
Blank wall plate $2
2x low profile sanwa arcade buttons $4

This was one of my first pi projects in my home automation endeavor. I wanted something simple and that wasn't too expensive. I decided to go with the PiFace add-on board.  
One really important thing I wanted was to be able to control the light switch via the web. I ran into a problem with the webapp though. Every time I opened it up it would reset the piface card. I found it was reinitializing the card every time it opened my cgi script. I then decided I needed a python program that would run on boot that would listen for commands to execute against the piface card. I then came upon Pyro, which came in very handy.

Source for my pyro piface

import Pyro.core
import piface.pfio as cmd
import os
from time import sleep
from sys import exit
from os import fork,chdir,setsid,umask


class Command(Pyro.core.ObjBase):
        def __init__(self):
          Pyro.core.ObjBase.__init__(self)
        def outputStatus(self):
          list1=cmd.read_output()
          status = '{0:08b}'.format(list1)[::-1]
          return status
 #output command for piface outputs
        def outputCmd(self,pin,value):
             cmd.digital_write(pin,value)
             return self.outputStatus()
#command to return input statuses
        def inputStatus(self):
          list1 = cmd.read_input()
          status = '{0:08b}'.format(list1)[::-1]
          return status
#read cpu temperature
        def pitemperature(self):
          return open('/sys/class/thermal/thermal_zone0/temp','r').read()
def main():
        Pyro.core.initServer()
        cmd.init()
        daemon = Pyro.core.Daemon()
        uri = daemon.connect(Command(),"cmd")
        print "cmd port: ", daemon.port
        print "cmd uri:", uri
        daemon.requestLoop()

if __name__ == "__main__":
  try:
    pid = fork()
    if pid > 0:
      exit(0)
  except OSError, e:
    exit(1)

  chdir("/")
  setsid()
  umask(0)

  try:
    pid = fork()
    if pid > 0:
      exit(0)
  except OSError, e:
    exit(1)
  main()


I then have either my button listener script(which runs as a daemon on boot) or the web cgi script. Here's the lightswitch.py daemon code:

import sys
from pymodbus.client.sync import ModbusTcpClient as ModbusClient
from os import fork,chdir,setsid,umask
from sys import exit
from time import sleep
import time
import os
import Pyro.core

def main():
        loop=True
#connect to the piface pyro daemon we created earlier
        cmd = Pyro.core.getProxyForURI("PYROLOC://localhost:7766/cmd")
        time_pushed=0
        pushed_1=False
        pushed_2=False
        longpush_2=False
        count=0
        client = ModbusClient('ip_address_of_modbus_IO')
        client.close()
        while loop:
                sleep(.05)
                status = cmd.outputStatus()
                inputstatus = cmd.inputStatus()
#toggle button turn relay 1 on
                if inputstatus[0]=='1' and pushed_1 != True:
                        if status[0]=='0':
                           cmd.outputCmd(0,1)
                        else:
                           cmd.outputCmd(0,0)
                        pushed_1=True
                if inputstatus[0]=='0' and pushed_1:
                        pushed_1=False
#toggle button turn relay 2 on
                      if inputstatus[1]=='1' and pushed_2 !=True:
                        pushed_2=True
                        longpush_2=False
                        time_pushed=time.time()
#if both buttons are pressed for 10 second the reboot the pi
                      while inputstatus[0]=='1' and inputstatus[1]=='1':
                        sleep(1)
                        count=count+1
                        if(count==10):
                          os.system("sudo reboot")


#button released
                     if inputstatus[1]=='0' and pushed_2:
#calculate the time the button was pressed to determine what to do
                        time_taken = time.time()-time_pushed
                        pushed_2=False
                        if(time_taken<.5):
                         if status[1]=='0':
                           cmd.outputCmd(1,1)
                         else:
                           cmd.outputCmd(1,0)
#send command to remote i/o using modbus to turn on some lamps if you hold the button longer than 1/2 second
                        if (time_taken>.5):
                         try:
                          if(client.connect()):
                           if(client.read_discrete_inputs(200,1).bits[0]==True):
                             client.write_coil(0,True)
                           else:
                             client.write_coil(2,True)
                           client.close()
                         except:
                           e = sys.exc_info()[0]
                           f=open('error.log','w+')
                           f.write(e+'\n')
                           f.close()
                        time_pushed=0
#turn off light at certain time
                        hour=time.localtime(time.time())[3]
                        minute=time.localtime(time.time())[4]
                        second=time.localtime(time.time())[5]

                if(hour==5 and minute == 0 and second == 0 and status[0]=='1'):
                  cmd.outputCmd(1,0)


#useful daemon-like code:
if __name__ == "__main__":
  try:
    pid = fork()
    if pid > 0:
      exit(0)
  except OSError, e:
    exit(1)

  chdir("/")
  setsid()
  umask(0)

  try:
    pid = fork()
    if pid > 0:
      exit(0)
  except OSError, e:
    exit(1)
  main()


I threw in a bit of modbus to talk to some of my remote i/o to control some lamps throughout the room. The web code is similar to the lightswitch code (without listening for button presses of course). It response to AJAX requests to give the statuses of the outputs. If desired I can post the web code later.

Pics


see part one to this series here:Sprinkler Control